Introduction
CSS stands for Cascading Style Sheets
If HTML describes the structure of a webpage, then CSS describes the styling (presentation of the page).
In addition, another web language JavaScript is often used with HTML and CSS to provide interactivity, such as doing something when a button is pressed.
CSS saves a lot of work. It can control the layout of multiple web pages all at once
External stylesheets are stored in CSS files
Syntax & Selectors
Every time we write CSS, we select the tag we want to work with, say which property we want to adjust, and give it the value we want to assign to it.
Selector:
– determines what the rule applies to
– normally the HTML element you want to style.
Declaration:
– Surrounded by curly brackets { } and ends with a semicolon ;
– consists of:
-Property – the attribute you want to change
-Value – the value that will be used for the change
selector {
        property : value ;
        property : value ;}
For example:
p {
    font-size: 12px;
    color: red;}
This would make all the text for paragraphs red with a size of 12 pixels.
A semicolon must be placed after each CSS declaration. Omitting this semicolon is the single most common mistake made by those learning CSS.
How to add CSS
We can add CSS code in any combination of three different ways:
Inline Style – CSS code is placed directly into an HTML element within the section of a web page. To define an inline CSS style, we simply add the style attribute to an HTML element with the CSS declaration as the attribute value
<h2 style="color:red;">CAUTION: Icy Road Conditions</h2>
<h2>Please Slow Down!</h2>
An inline style declaration is highly specific and formats just one element on the page. No other elements, including other
elements on the page, will be affected by this CSS style.
Since inline styles have limited scope and do not separate content from presentation, their use is generally discouraged. We won’t be using inline styles much in this class.
Internal Style Sheet – CSS code is placed into a separate, dedicated area within the section of a web page. To use an internal CSS style sheet, we add a section within the <head> of the page. All our CSS declarations go within this section:
<head>
  ...
  <style type="text/css">
    h2 {color:red;}
  </style>
</head>
<body>
  <h2>CAUTION: Icy Road Conditions</h2>
  <h2>Please Slow Down!</h2>
</body>
Styles declared in the internal style sheet affect all matching elements on the page. In this example, all <h2> page elements are displayed in the colour red.
Since formatting declarations are entirely in the section, away from the actual page content, internal CSS style sheets do a much better job than inline styles at separating content from presentation.
External Style Sheet – CSS code is placed into a separate computer file and then linked to a web page. To use an external CSS style sheet, we create a new file (with a .css extension) and write our style declarations into this file. We then add a element into our HTML file, right after the opening tag:
style.css (separate file):
h2 {color:red;}example.html file:
<head>
  <link rel="stylesheet" type="text/css" href="style.css" />
  ...
</head>
<body>
  <h2>CAUTION: Icy Road Conditions</h2>
  <h2>Please Slow Down!</h2>
</body>
The element instructs the browser to load the external file specified by the href attribute and to apply the CSS style declarations contained there.
The real power of using an external style sheet is that multiple web pages on our site can link to the same style sheet.
Cascade Rule
A web browser will process all CSS code it encounters, even if it is from all three methods.
For example, an external style sheet could define the font of a heading, an internal style sheet could specify the font size of the heading, and an inline style could italicise the heading. All three would be applied.
Sometimes a browser will receive conflicting instructions from the CSS code. For example, what if each of the above CSS sources specified a different colour for the heading text.
Browsers need a consistent way of settling these formatting conflicts in a consistent fashion. That is where the “cascade” of cascading style sheets comes into effect.
We use the term “cascading” because there is an established order of priority to resolve formatting conflicts:
- Inline style (highest priority)
- Internal style sheet (second priority)
- External style sheet (third priority)
- Web browser default (only if not defined elsewhere)
For each HTML element, the browser will see which styles are defined inline and from internal and external style sheets. For any conflicts detected, it will use this priority system to determine which format to display on the page.
In the prior example, the heading text would display in the colour specified by the inline style, which outranks all the others.
If multiple, conflicting styles are defined in the same style sheet, only the final one will be applied. Be careful, as this is another common mistake made by beginners.
Styling
Use the W3Schools editor to try styling each of these properties:
Background
http://www.w3schools.com/css/css_background.asp
Text
http://www.w3schools.com/css/css_text.asp
Fonts
http://www.w3schools.com/css/css_font.asp
Tables
http://www.w3schools.com/css/css_table.asp
Using ID and Class selectors
In addition to setting a style for a HTML element, CSS
allows you to specify your own selectors called “id”
and “class”.
- An ID
- can only be used once to specify a style for a single, unique element.
- have higher specificity than class (overwrites class – remember the cascade rule?)
- A class
- can be used several times
- you should use classes for items that you know you’re going to use a lot.
- An example would be if you wanted to give several paragraphs on your webpage the same styling, you would use classes.
Class selectors
Use when applying a style to a group of HTML tags e.g. Most paragraphs are normal, some paragraphs are quotes.
CSS code:
.className { property: value; }.first
{
text-align: center;
font-style: italic;
}HTML source code (Assign the tag to the class using an attribute):
<tag class=“className”> … </tag><p class=“first”> If you can’t make it good, at least make it look good.</p> ID selectors
Use when applying a style to a single HTML tag e.g a unique identifier to an element
CSS Code:
#idName { property: value; }#news
{
text-align: center;
font-style: italic;
}In HTML source code (Use an attribute to specify the id used for the tag):
<tag id=“idName”> … </tag><header id=“news”>
Copyright 2006
</header> CSS Box Model
The box model is a tool we use to understand how our content will be displayed on a web page.
- Each HTML element appearing on our page takes up a “box” or “container” of space.
- Each box size is affected not only by content but also by padding, borders, and margins.
- By knowing how to calculate the dimensions of each box, we can accurately predict how elements will lay out on the screen.
- As we build a new page, we can arrange these boxes on the screen, creating a balanced layout with white space around the content.
The importance of the box model concept cannot be overemphasised. It would be difficult and frustrating to create a website without understanding this concept.
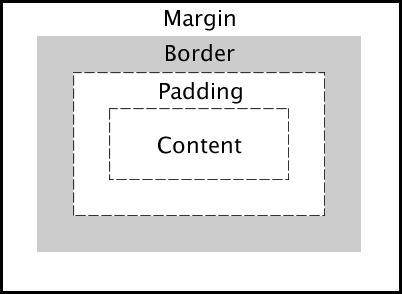
- Margin
- Clears an area around the border. The margin does not have a background colour, it is completely transparent.
- Border
- A border that goes around the padding and content. The border is affected by the background colour of the box.
- Padding
- Clears an area around the content. The padding is affected by the background colour of the box.
- Content
- The content of the box, where text and images appear.
The easiest way to understand these components is to use one of the most versatile tools available to us as web designers: the <div> element.
The <div> (“division”) element groups other elements on the screen.
- By setting the width and height attributes via CSS, we can reserve a precise amount of space on our page for specific content.
- The actual content is nested and contained within the opening <div> and closing </div> tags.
- When we apply CSS styling directly to the <div> element, all the elements contained within that <div> will inherit that style.
- By using multiple <div> elements as building blocks, we can design an entire web page layout.
Position
Elements can be positioned using the properties: top, bottom, left and right. These properties will not work unless the position property is set first.
They also work differently depending on the positioning method. There are four different positioning methods:
- Static: (default) positioned according to the flow of HTML code
- Fixed: positioned relative to the browser window (and does not move)
- Relative: A relative positioned element is positioned relative to its static position.
- Absolute: positioned relative to the first parent element that has a position other than static. If no such element is found, the containing block is <html>.
Float
With CSS float, an element can be pushed to the left or right, allowing other elements to wrap around it. Float is very often used for images, but it is also useful when working with layouts.
Comments
If you have a very large project or you work in a team, then you’ll need to help others understand your CSS stylesheet better by adding comments to it. A CSS comment is used to add explanatory notes to the code or to prevent the browser from interpreting specific parts of the style sheet. By design, comments have no effect on the layout of a document.
In the example below, everything between the /* and */ will be disregarded, even if the comments span multiple lines.
.infobox {
  height: 200px;
  width: 150px; /*Do not make wider!*/
  background-color: teal;
}
/*
This footer section needs to be updated next January.
*/
.footer {
  text-align: center;
  /*font-weight: bold;*/
  font-size: 24px;
  color: brown;
}
CSS comments are often used when experimenting with styles or troubleshooting problems. Rather than deleting style declarations and then retyping them again, we can just “comment them out” temporarily, evaluate the effect, and then restore the style by removing the /* and */ characters.